


How to Shop for Home Insulation in 2025
The right insulation will keep your home comfy and your energy costs low. Here’s how to calculate how much you need and what kind to buy.


By slowing the transfer of heat between your house and the outdoors, insulation helps keep your living space cooler in the summer and toastier in the winter—all while shrinking your energy bills. Adding insulation to a typical home’s attic, flooring, basement, and crawl spaces can lower total energy costs by an average of 11 percent if you also plug unwanted air leaks.
That’s partly because 9 out of 10 homes in the U.S. are underinsulated, according to the Environmental Protection Agency, with older residences especially likely to need the extra care. Knowing what sort of insulation to use and where and how to install it for the best results can be tricky.
We’re here to guide you through the process.
Where Is Home Insulation Useful?
Because warm air rises, the attic is the best place to start, particularly for those in colder climates. But any living space adjacent to the outdoors or, say, a transitional space such as a garage can benefit from insulation, creating a better thermal barrier around your home.
CR's Guide to Home Improvement
Find top-rated products and expert tips to help you save energy and money—and protect your home from extreme weather.
How to Calculate How Much Insulation Your House Needs
To figure that out, it’s important to understand R-value, which measures the ability of insulation to resist the transfer of heat. The higher the R-value, the more powerfully the material in the product insulates. Every option—from fiberglass rolls to blown-in cellulose—displays its R-value on the packaging, allowing you to calculate the total R-value reached in a specific area of your home.
Now you’ll just need to do some simple addition. Say you buy one layer of R-19 fiberglass batting and stack another layer of R-30 fiberglass batting on top. That gives you a total R-value of R-49 in that space. You can even calculate the R-value of existing insulation by measuring its depth, noting the style of insulation, and then finding the typical R-value per inch of that material. Say you find 14 inches of blown-in cellulose insulation, which has a typical R-value of around R-3.5 per inch, in your attic. That means your attic is insulated to about R-49, or 14 x 3.5. Keep in mind that you can add up the R-values of different types of insulation.
So what’s the ideal R-value for the attic in your house? That’s largely a matter of geography. You want to find out what climate zone you reside in and then look at the recommended R-value. In balmy South Florida, for example, installing one layer of R-30 fiberglass insulation in an attic is considered sufficient. But in wintry Wisconsin, you may want to add R-60 insulation to a previously uninsulated attic, requiring you to stack two layers of R-30 fiberglass batting.
How to Choose the Right Insulation for Your Home
Insulation comes in a variety of styles, each with its own strengths and weaknesses.
To start, you may want to consider the ideal structure. Batting insulation, for example, comes in flat, precut blankets of different sizes and thicknesses, allowing you to simply lay, stack, or fit it between the joists, studs, and rafters in ceilings, floors, and walls. Insulation sold in barrel-like rolls has to be unspooled and cut to fit using a utility knife. It’s fairly easy to do, but it does require a little extra effort.
Batts and rolls are versatile, easy to install, and relatively inexpensive. You can find them at almost any home improvement store.
By comparison, loose-fill—or blown-in—insulation requires equipment that you can rent from a home improvement store. Often made of unstructured fiberglass or cellulose, loose-fill fits snugly in odd-shaped holes and insulates hard-to-access wall cavities with relative ease. But if not packed densely enough, it’s more prone to settling over time, lowering its effectiveness. Loose-fill insulation can also be trickier to remove or shift around when you need to access the space.
Your next big decision has to do with the thermal materials used in the insulation you’re considering. Options vary based on your needs, including budget, the R-value, the size and shape of the area you plan to insulate, and factors such as the space’s moisture levels. Here are the pros and cons of the most common insulation materials.
Fiberglass
Pros: Fiberglass insulation, made of molten glass spun or blown into fibers that trap air and slow heat transfer, is by far the most common choice, making up about 70 percent of the insulation market. It’s inexpensive, easy to install, and versatile. It comes in batts, rolls, and loose-fill style.
Cons: It has a modest R-value and is more permeable to air than, say, spray foam insulation, so effective sealing before insulation is critical. While the fiberglass particles in some new products are less troublesome than those of old, they still can cause irritation to your eyes, skin, and respiratory system. So it’s good to wear goggles, gloves, full-coverage clothing, and a respirator when installing or handling the materials.
Typical R-value: R-3 to R-4 per inch of thickness, though high-density fiberglass can go higher.
Where commonly used: Many places in a house, including attics, walls, floors, and basements.
Cost: $0.30-$1.50 per square foot, on average.

Photo: Shutterstock Photo: Shutterstock
Cellulose
Pros: Cellulose insulation, made of recycled paper and wood products, is typically offered in the loose-fill format. It conforms easily to unusually shaped spaces and hard-to-reach crevices, making it particularly handy for use inside finished walls or attics where you may want to insulate around pipes or HVAC equipment. It’s typically treated with the mineral borate to improve fire and pest resistance.
Cons: The material is more prone to retaining moisture and settling over time if not packed densely enough, which may reduce its effectiveness and require you to replace it. It can also be very dusty, so you’ll want to wear a respirator while installing it.
Typical R-value: 3.1 to 3.8 per inch of thickness.
Where commonly used: Attics and wall cavities.
Cost: $0.60-$2.30 per square foot, on average.

Photo: Shutterstock Photo: Shutterstock
Foam Board
Pros: Foam board, aka rigid foam, is made from fibrous materials or plastic foam that has been shaped into stiff boards. It has a high insulating value relative to its thickness. It’s also particularly moisture- and pest-resistant, making it a good choice for basements, crawl spaces, and exterior walls.
There are three main types:
• Polyiso, which has the highest R-value
• Extruded polystyrene (XPS), which is particularly moisture-resistant
• Expanded polystyrene (EPS), which is often the cheapest
Cons: Foam board insulation can be harder to install snugly in unusually shaped spaces, leaving gaps for air to flow. To create an effective air and moisture seal, you need to tape all seams between the boards. This option also tends to be pricier.
Typical R-value: R-3.8 and R-6.8 per inch of thickness, depending on the type.
Where commonly used: Basement and crawl space walls, and as continuous insulation on a house’s exterior.
Cost: $0.25-$2 per board foot, on average.

Photo: Getty Images Photo: Getty Images
Spray Foam
Pros: Once sprayed, polyurethane foam sets, expands, and hardens. It’s admirably airtight—often negating the need for additional sealing—and moisture-proof, making it perfect for hard-to-fill nooks and crannies. The open-cell option has an R-value comparable to fiberglass, but closed-cell foam is denser, more rigid, and more moisture-resistant, with a higher R-value.
Cons: Closed-cell spray foam almost always requires professional installation. You and your family must stay away from your house for at least 24 hours as it cures. While you can find environmentally friendly options, many closed-cell spray foams use blowing agents that deplete the ozone layer and contribute to global warming.
Typical R-value: R-3.2 to R-7.5 per inch of thickness.
Where commonly used: Inside unfinished wall cavities, attics, and basements, and as continuous insulation on a house’s exterior.
Cost: $1-$2 per square foot, on average.

Photo: Shutterstock Photo: Shutterstock
Insulating Different Areas of Your House
Attic
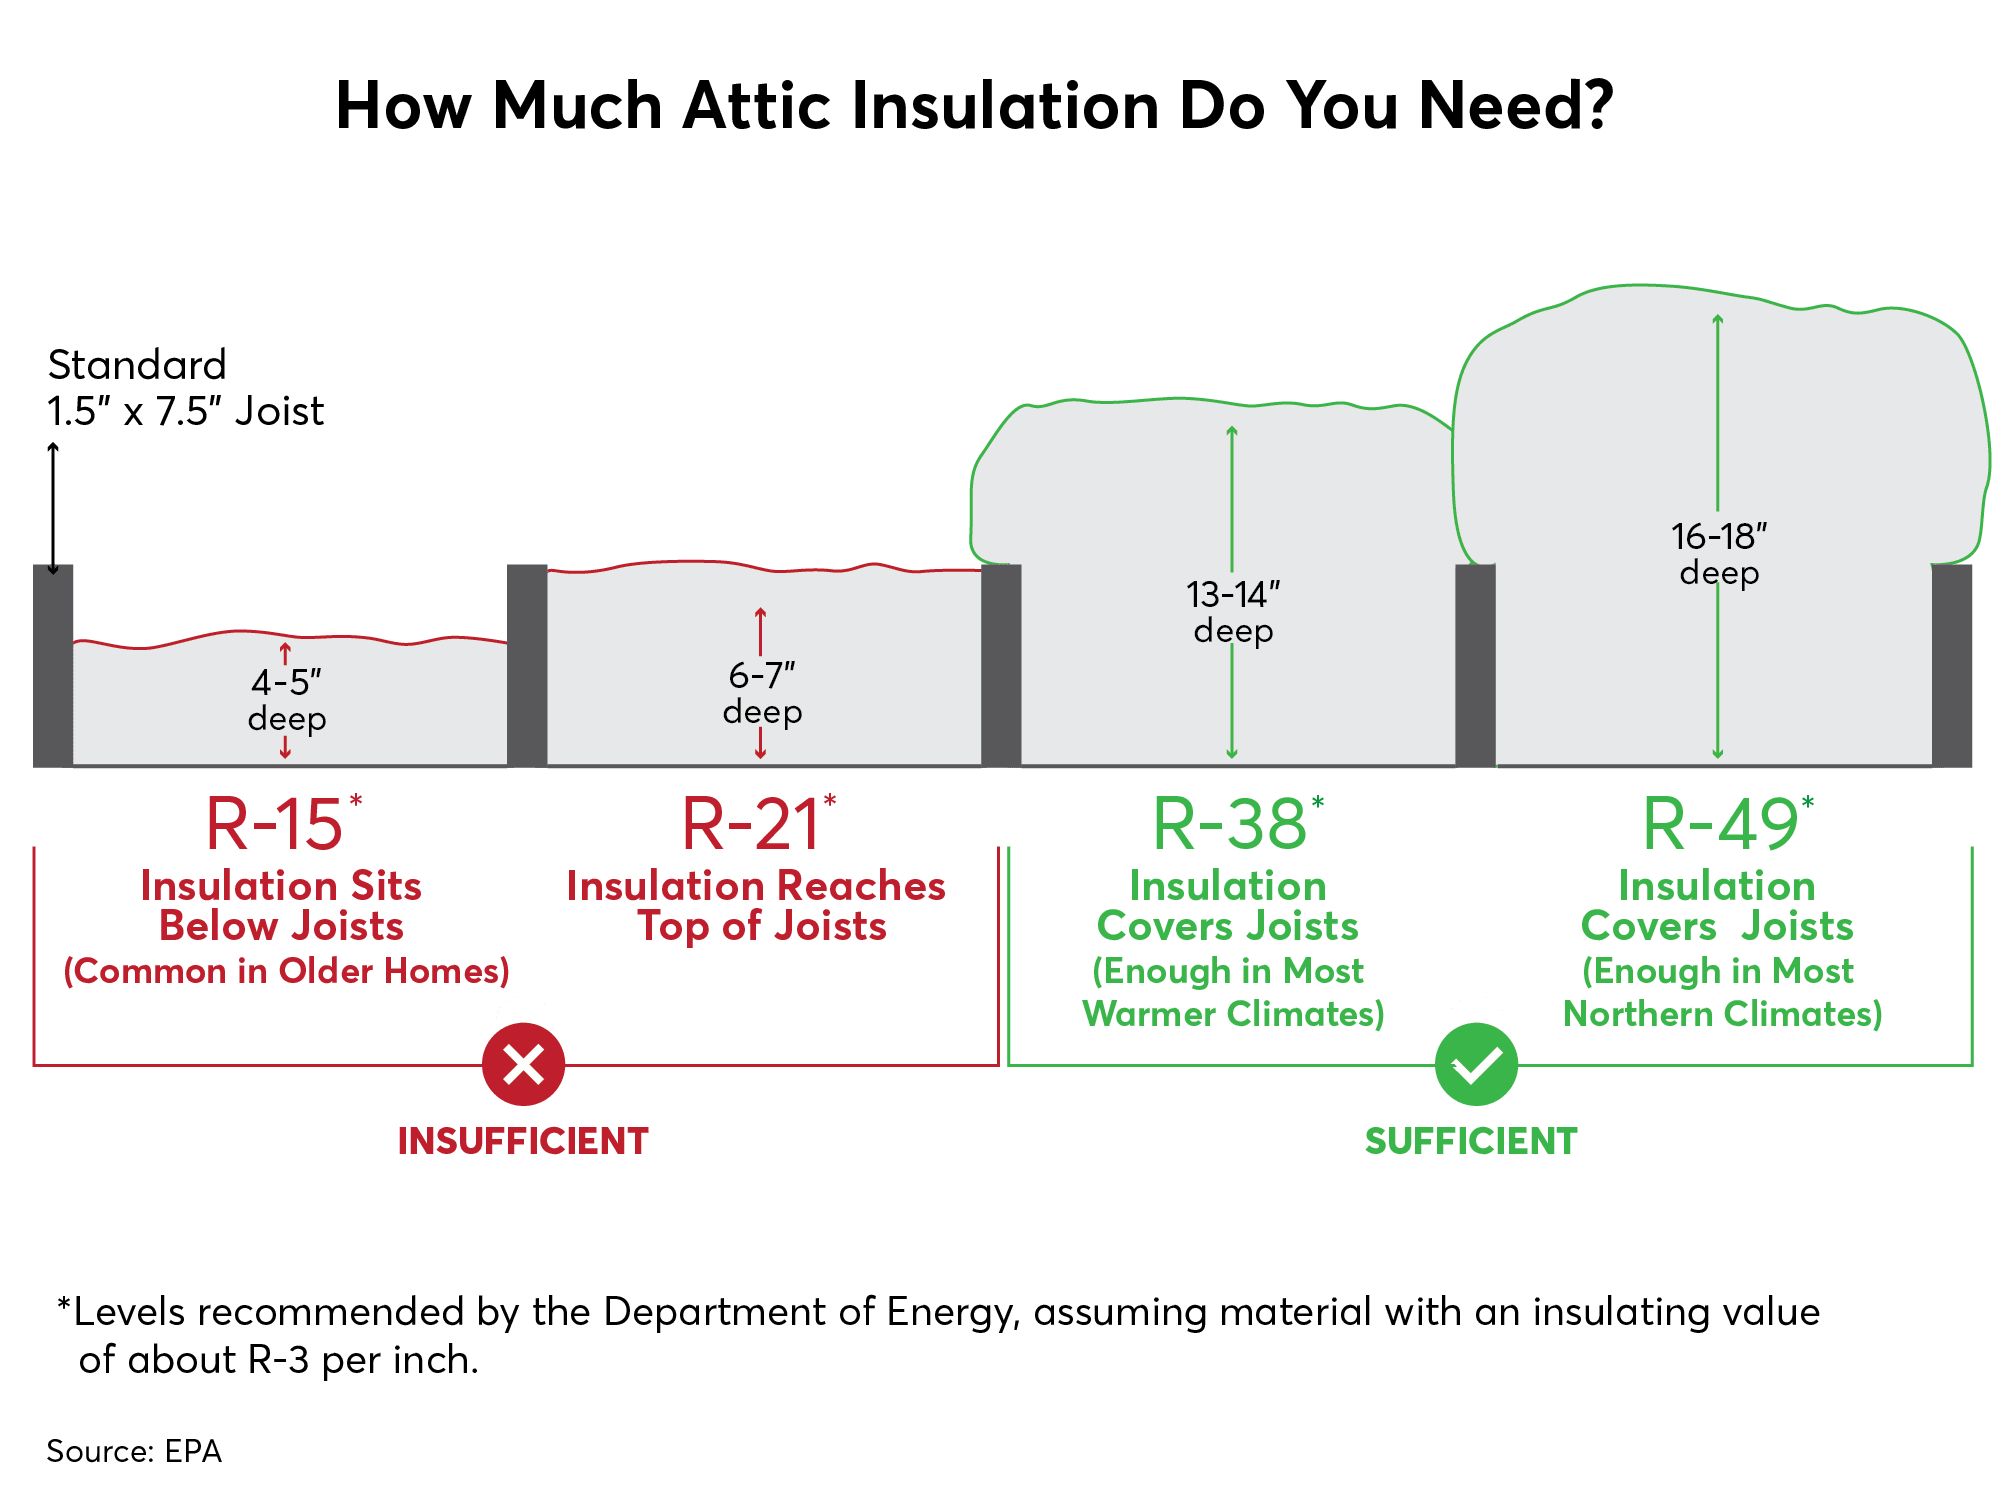
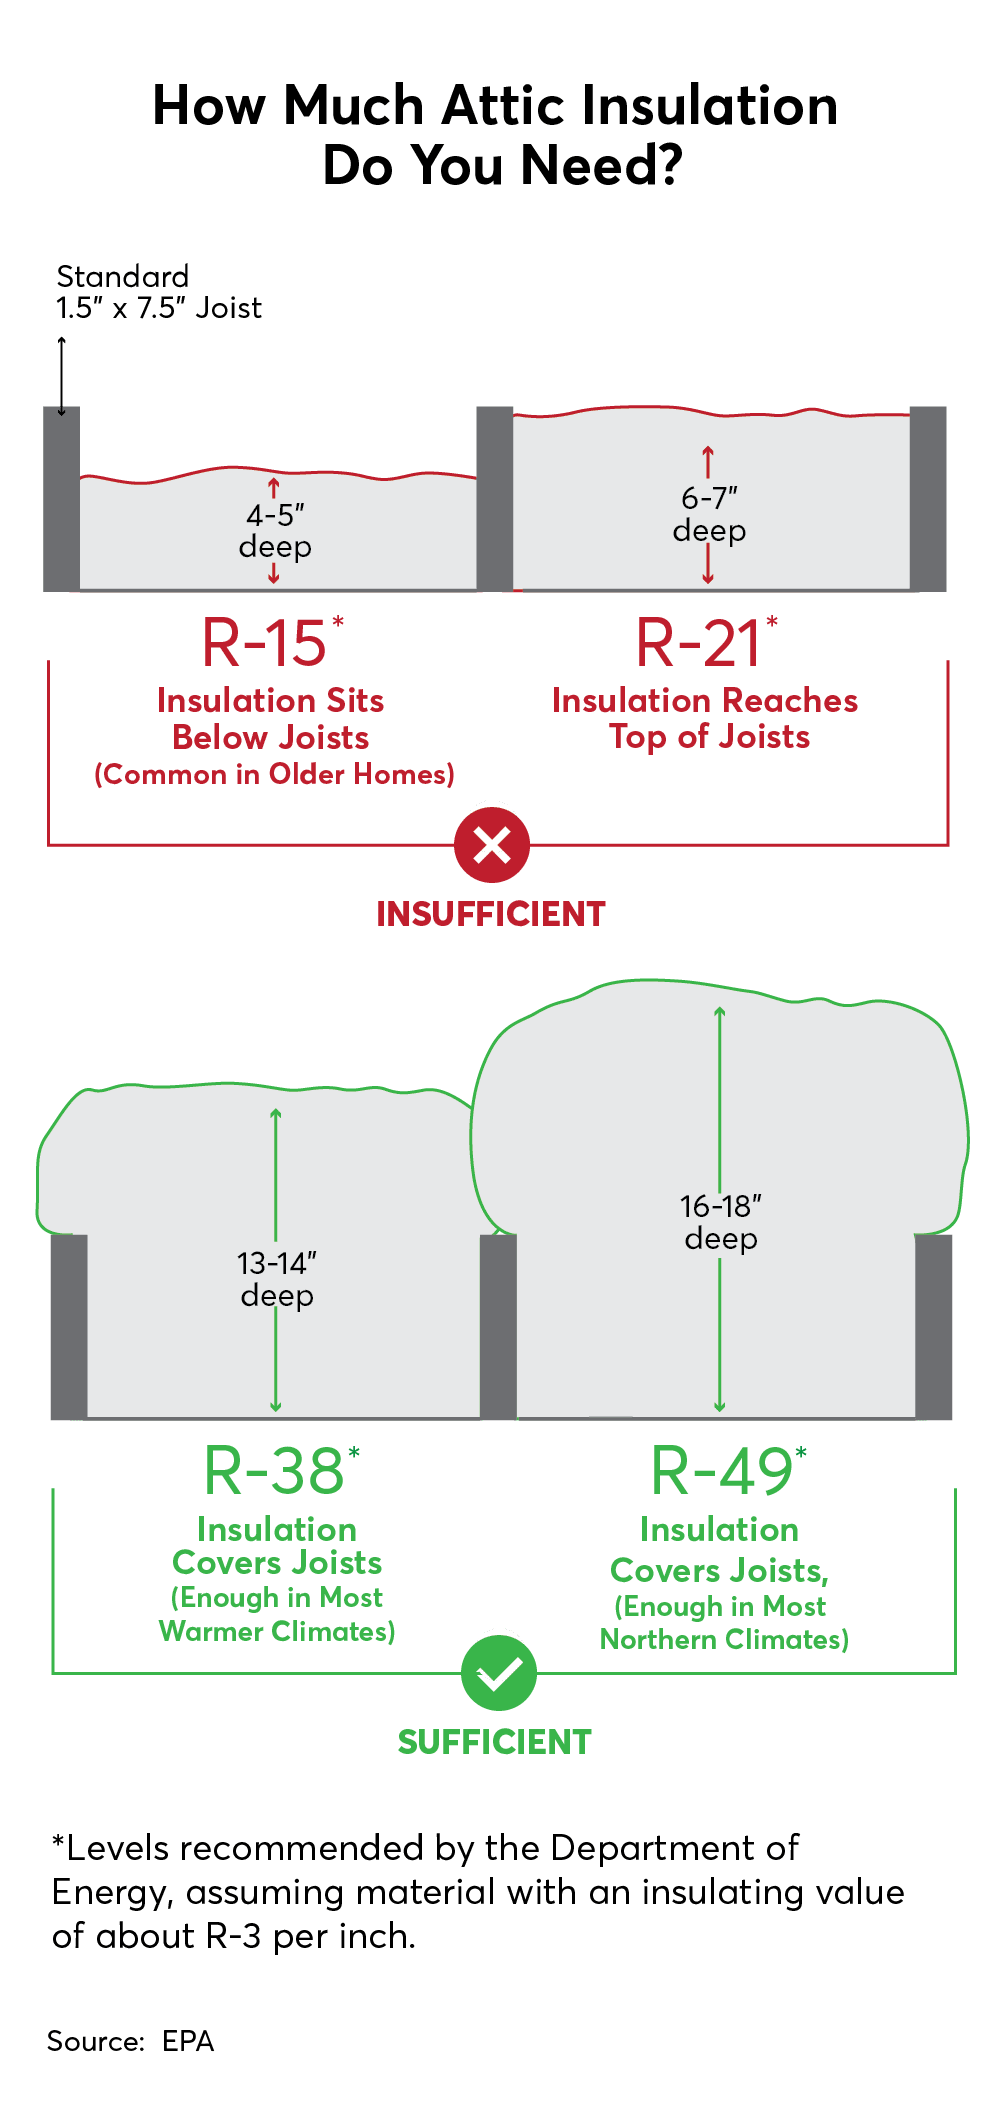
The attic is where you’ll get the biggest return on your investment. It’s also one of the easiest areas to tackle on your own. Start by installing insulation between the joists that run along an unfinished floor. You can even add more on top of what’s there. (If the existing insulation is faced—meaning it has a moisture barrier attached to it—you don’t want the layer you add to be faced, too.) Aim for at least 13 to 14 inches of attic insulation if you live in a warmer climate and 16 to 18 inches in colder climates, assuming an insulation value of around R-3. One good general rule: You should have enough insulation to cover the floor joists, making them no longer visible.
Walls
Adding insulation to the living space of a finished home can get pricey, sometimes requiring professional help to remove and replace drywall or exterior siding. To determine how well your walls are insulated, you can cut holes in the drywall or use a thermal imaging camera. Blown-in fiberglass or cellulose insulation and spray foam are common choices for wall cavities. They can be used in conjunction with foam board sheathing on the exterior. Insulating interior walls can help with soundproofing and confining space heating to certain areas of the home. It’s also beneficial in condos or apartments that share a wall with a unit that sits empty or unconditioned.
Basement and Crawl Spaces
Basements can account for about 25 percent of a dwelling’s heat loss. One way to counter that is by insulating the walls and ceiling with options like foam board, fiberglass-faced batting, or spray foam. To avoid moisture problems, check for wet walls and water on the floor before starting, and address any large drainage problems.
If you’re using insulation other than XPS rigid foam or spray foam, consider adding some sort of vapor barrier as well. This prevents the movement and accumulation of moisture, which can degrade insulation, cause mold and mildew, reduce air quality, and damage the structural integrity of your home. You can install vapor barrier sheets, often made of plastic, foil, or silicone, alongside the insulation or go with faced or kraft insulation, which has a built-in vapor barrier. Either way, the vapor barrier typically faces whichever side of the structure is warmer.
Any crawl space beneath the ground floor is another prime spot for heat transfer. In some cases, the floor above it has sheathing that may conceal preexisting insulation. You can install more on the space’s ceiling and walls. Once again, addressing moisture and potential water drainage issues first is key. Some people opt for what’s known as a crawl space “encapsulation,” which typically involves the installation of a vapor barrier around the entire space for a more moisture-proof seal.
Ductwork
Placing insulation around the ducts that carry air to and from your heating and cooling systems can improve their efficiency by as much as 20 percent. Just be sure to plug air leaks along the joints of the ducts first.
Water Heater and Pipes
According to Home Depot’s home improvement experts, insulating your water heater and pipes can reduce standby heat loss by as much as 45 percent. You can wrap precut jackets or thermal blankets around your water heater and tubular insulation around pipes, potentially reducing heat loss by about 2° F to 4° F.
Key Questions
How Much Insulation Do You Need?
This depends on where you live, the suggested R-value for specific areas of your home, and the size of the space.
But it’s pretty easy to figure out: The Department of Energy offers a handy map organized into climate zones. Once you identify your climate zone, you can find the recommended R-value for common insulation projects. For example, an uninsulated attic should end up between R-30 and R-60, depending on your region.
Once you know your target R-value, you can use the R-values provided for insulation products to plot out your project. For example, if you’re installing fiberglass batting in your attic that provides a total R-value of 30, you would need to put down two layers to reach R-60, plenty for a cold climate. Next, you calculate how many batts, rolls, or bags of loose-fill you need by measuring the total square footage of the space.
How Much Does Insulation Cost—and How Much Will It Lower Your Energy Bills?
According to the home-services platform Angi, the cost of an average insulation project ranges widely, from around $500 for a DIY job to more than $4,500. The insulation cost per square foot ranges from 25 cents to $6.75. Attic insulation, including labor and material costs, is estimated to cost between $1,500 and $6,000, though you can lower that by doing the work yourself.
Here are a few more things to consider:
- Are you hiring a contractor or going DIY? Installing insulation yourself will save $575 to $750 in labor fees, but it may be worth it to hire a contractor, especially if it means the job is completed more effectively.
- Are you buying the insulation in bulk? If so, you may be eligible for a discount.
- Do you need to remove existing insulation? It might not be necessary unless it’s degraded, drooping, condensed, or damaged by water or pests.
- Do you need to rent equipment such as a pneumatic device to blow in insulation?
- Does the project require additional work, such as opening up drywall?
On the bright side, insulation brings a significant return on investment by reducing heating and cooling costs, the two biggest slices of your energy bill. As we mentioned, sealing and insulating a home saves around 11 percent on total energy expenses, or about $200 a year when looking at the most recent data on average U.S. household energy expenses.
If you spend $700 on insulation, you’ll probably get a return on your investment in a little over three years while reaping the benefits in comfort on Day 1. The colder the climate you live in and the less insulation you start with, the higher your savings will be. The federal government and many state and local governments and utilities offer rebate programs and tax incentives for home insulation. You can claim a 30 percent federal tax credit, up to $1,200 per year, for certain insulation and weatherization upgrades, including material and labor costs. A number of other incentives are available via state governments and local utilities.
Should You Get a Home Energy Audit?
A professional home energy audit is a relatively inexpensive way to determine precisely where your home needs more insulation. It can pinpoint air leaks that need patching first, too. You can find a certified energy auditor through your utility company, state and local government agencies, or resources like this Residential Energy Services Network directory. Some insulation professionals offer a preliminary home energy audit as part of an installation package. The Department of Energy recommends that a professional auditor conduct a blower door test and a thermographic test. Energy audits are eligible for a 30 percent federal tax credit, up to $150.
How Do You Find the Best Insulation Contractor?
The EPA recommends contractors who have been vetted by experts like the Building Performance Institute, Owen Corning’s Certified Energy Expert program, or its own Home Performance Program. Your local utility company may also provide a list of vetted experts.
Make sure that whoever you hire has insurance, a license to work in your state, and training to complete your specific installation project.
It’s good to have at least three contractors provide cost estimates. Ask them questions, like whether they plan to seal air leaks first, take extra steps like insulating your attic’s hatch, and have the equipment needed to insulate an older home.
Once the project is complete, monitor your energy bill, as well as indicators like temperature disparity across rooms, to see whether the work was sufficient. If the savings aren’t substantial—or your home remains uncomfortable in the hottest and coldest parts of the year—it may be time to add insulation to another part or bring in another professional to complete the job. A well-done insulation project should make your home more comfortable (and save you money) year-round.

